Wednesday, December 17, 2008

How to make a Calendar in PHP?

Calendar using php code is to be made. This calendar shows one month and has previous and next buttons on it, which when clicked opens the calendar of previous and next month.

The code for this is written in notepad. Below is the php file.


First an array is made, which puts the month names in a variable named ‘month names’. Then some variables are named like previous month, next month, previous year and next year. In previous month variable, current month minus one is given, cMonth is the current month. If loop is started, if the next month is 13, it means it is the 1st month of a new year.

 This is the continued coding of the first one.


Then a table of calendar is to be made.In this we give its heading as 'Calendar'.Table row,header tags are started, some alignment is also done.

Then a table of calendar is to be made. In this we give its heading as 'Calendar’. Table row, header tags are started, some alignment is also done.

Two links naming previous and next are made with href tag. All tags opened are closed.

‘Tr’ tag is started, in which there are various td tags, and these td tags are for table data.6 td tags are opened for Sunday to Saturday. These are aligned in center, bgcolors and style color is also given. We can use different bgcolors.

The ‘mktime’ function used here returns the UNIX timestamp for a specified date.

Then a for loop is started if the variable ‘i’ is less than the starting day, it will return the current day, otherwise +1 day to the starting day.


So write this code in notepad and put into htdocs folder of xampp server.And run on your localhost by giving the address:

http://localhost/calend.php

This will show the following output:


This is the December month and had Previous and Next links on it, which opens the following window: These are the next months and previous month. So in php to make calendar is simple. It can be modified also by adding some colors in the table.


Monday, December 15, 2008

Php and MYSQL Connection

This problem is about making a connection of php with MySQL, then creating a database and table in it. Then we will add some fields to he table and display the result in html table on browser.

Write the code of php in notepad for making a connection to MySQL. Here is the code of making a connection to MySQL, creating a database and table.

Here connection is being made to the MySQL with the function mysql_connect('servername','username','paswword').This MySQL connect function is put into con variable. In php '$' is used for variables. If else statement is used, if connection is established then Connection established successfully is printed with echo statement otherwise a MySQL error is displayed.

Then a database is created with the function mysql_query("CREATE database name, connection variable).Here connection variable is 'con'.Here also if else statement is used, if database is created then Database created statement is echoed otherwise a error is echoed.

Then 3rd step is to create a table in the database. A table structure is made in the database  naming ‘Persons’ with the statement ‘CREATE TABLE Persons’ and is put into a variable naming ‘sql’. This table has three fields that are: Firstname, Lastname and Age. Names are assigned to ‘varchar’ type and age to ‘int’ type. In the same manner if it creates table then echo statement is used to print Table created, otherwise an error is displayed.

At last connection is closed, after making connection, database and table respectively.


This is the output of the code when executed by giving address in the browser, http://localhost/create.php.

"Connection established, database and table created”.


Next an html form is created which will take firstname, lastname & age. This will call ‘insert.php’ file to submit the data in database with the method 'post'.

Three textboxes are made naming FirstName, LastName & Age. And a Submit button is made. Then all tags are closed. This when executed will display this output.

This is the html form, having three textboxes and a button which will submit the data in database and in other window, fields are inserted and submit is clicked.


This html file will call ' insert.php'. In first Martin Pfurner with age 40 is added and in second window Kabir Nanda with age 19 is added.  


Here in this php code, first connection is made.

Then a particular database is selected, where these entered fields will be inserted using sql statement.

 In values in the sql statement, post method is used for the three fields.After record is added, this gets echoed. And connection gets closed.

 The output of this code is displayed in browser window below:


This is the insert.php output and adds the record to the database and displays the statement:

 '1 record added'. 

Now to retrieve these submitted fields, php code is written, which will display the html table having these two fields.


Here first connection is made, and then a database is selected. A query is written which selects all rows of the table using statement:

mysql_query ("SELECT * FROM Persons");

 Using html, a table is created. A row is created, with three fields in it using 'tr' and 'th' tags of html.

This will fetch the array and will put them in the row, under different headings. These will be echoed.

And table tag is closed. Then MySQL connection is closed. This code when executed, will display the name and age in html table. Its output is:


This way an html table is displayed in the browser by first making a Php and MySQL connection, then creating a database and last table in which fields are entered.


Friday, December 12, 2008

PHP Calculator

For making a calculator in php which performs basic function like addition, subtraction, division and multiplication, PHP has to be installed on your system.

At first open the notepad to write the html code for creating layout of the calculator. We want two textboxes to put two inputs on which function is to be performed like addition, subtraction and others. And we need 4 buttons naming Add, Subtract, Multiply and Divide. And title we want to give to this is “Calculator”.

So the code of this html is:

Give title to the code"Calculator.”

And in tag give Calculator as Heading. Then in body tag, write a form tag which calls ‘calculator.php ‘file.Use the "post method”.

Then make two textboxes, giving its input type as text and name as i1 and i2 respectively.


Make 4 buttons of input type Submit and write in name and value: ADD, Subtract, Multiply and Divide. Close the form tag and body and html tag too. Save this html file in "htdocs" folder of your server, I saved it in Xampp as I am using this server. Then execute this in browser by writing http://localhost/calculator.html

This will display the calculator form which contains two input textboxes and 4 buttons as shown above in the window..


Now next part is to write Php code as this html file will call php file, so write the code in the notepad and save it as "Calculator.php" in the 'htdocs' folder of Xampp. Code of this php file is:


Heading “solution” is given as this page will be the solution of any function performed. Then php tag is started. Six variables are assigned the Request method which will request the particular function. Then if loop is started ,if function is of ADD, then input 1 and input 2 are added and are inserted in result variable. Printf statement is used which will print the result of the addition of input 1 and input 2. Else loop is used when function is other then of addition.

Like above else is used if function is of subtraction. Same is the case here after subtracting the two inputs, they are inserted into an variable naming “result”. Then using printf statement, result is printed. Difference between all these are only their signs, like for addition + are used, for subtraction ‘-‘is used.

At the end, a href tag is used to display a link on the solution page, which when clicked will open the previous calculator page. And body and html tags are closed.

Now we will provide two inputs in the textboxes and will perform different functions on them.


Two inputs 458 and 24 are provided in two textboxes. Now we will perform addition, subtraction and other functions also. By clicking Add button, 'calculator.php' file will be called and a solution page will open which will give the result after addition and a link named” Return to the Calculator"  which opens the previous page.


In the same manner others are performed. We will look applying other functions on these two inputs only.


This way multiplication, division and subtraction are performed. This way a PHP calculator is prepared with the help of html and php code, and this is the simplest calculator in design.


Thursday, December 11, 2008

How to use joomla?

This blog describes about how to use Joomla for making websites. I add some changes, in the basic Joomla site of GIS Engineering.

I. At first the layout of the site is like in the picture shown below:


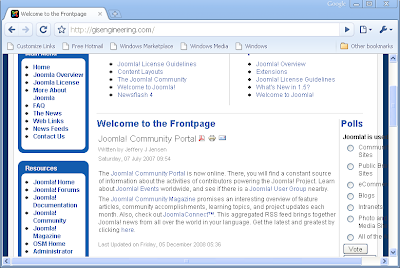
This displays the main menu which contains: Home, Joomla Overview, and Joomla License, More about Joomla, FAQ, The News, Web Links, News Feeds and Contact Us. Similarly Resources has some fields in it.


II. By clicking home in the main menu, it opens the page which shows the article Joomla Community Portal as shown above. As the site is of GIS Engg so by clicking it must open some content of GIS Engg only. So I post an article of GIS Engg and displayed it on the front page.

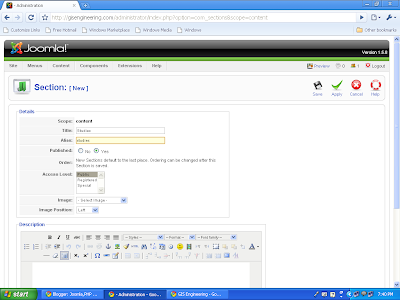
Now how to post this article GisEngg is explained with the help of screenshots.At first a section named “About GIS” and category named “general” is to be made.

This is the Section Manager page. Click new on the right side of the page and make a new section naming “About GIS”. 

After clicking save button on the right side, new section naming “About GIS “is made and shown below in picture


Same is the case with the Category Manager, from there make a new category by clicking the new button (green in color).A new category named “General” is made and is put into “About GIS” section. This is shown below:

Make a new article naming GIS Engineering and put it onto the FrontPage by marking yes in the radio button on the right of the window shown below .Put it into the section and category just made. Click save button, this article will get post on the FrontPage.


Article on frontpage is shown below:


III. Now we want Joomla Overview in Main menu to replace by GIS Engineering. So go to Main menu in Menu, a Menu Item Manager will open. Here is the list of menu item. A window of menu item is shown below:

Click on the Joomla overview to edit it. Take the menu item type to be of article layout. Display it in main menu. Put it on the top in parent item. And publish it marking yes in the radio button. Place it where Joomla overview resides, on order number 6. Select the article in the basic parameters by clicking select button on the right of the box. And save it. This will then be view on the front page. You can make the changes in the parameters of component and system as per your requirement.


Main menu has been changed. GIs Engg is displayed instead of Joomla overview, shown in the window below:


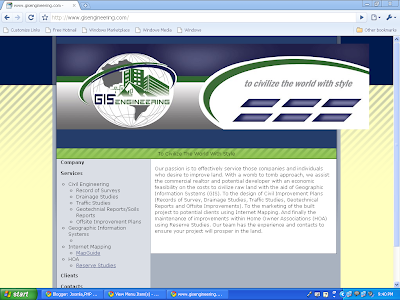
By clicking GIS Engineering in the main menu, it opens a new page showing the article, as it is of type article layout. Page is show below:


IV. Now the next step is to change Joomla license to GIS Engg to civilize the world with the style in the main menu. Here also we will make the changes as above we performed. Open the menu item and click on the Joomla license to edit it. A window will appear shown below.


Make it as the article layout. Then give it a title "GIS Engg to Civilize the World the Style". Display it in Main menu. Put it on top in parent item. And mark yes in published and give it as 7 Joomla license order. it will get replaced by this new field. In Access level mark it as public. From parameters (basic) select an article GIS Engg which we created before. Then save it. It will get display on the front page, its window is:


By clicking on the GIS Engg to Civilize the World the Style in the main menu, a new page get open which displays the article on GIS Engg shown below:


V. Next step is to replace Reserve Studies in the main menu with the “More about Joomla”. As this will also be of type article layout, so first we will make a new section and category in the same manner we created before. A section name “Studies” and category name “Reserve” is to be made. Window of section named Studies is displayed below:

 
 Click save button. Window of category named Reserve is shown below:

Put into the section named Studies and publish it by marking yes in the radio button. Click on save button.

Add an article, by clicking “add a new article” in the control panel. Publish it but don’t put on the front page. Add content of the article in the box, put into the section named studies and category named reserve. Make changes in the Parameters of advanced type.


In parameters(advanced) tab, in “show title” mark no in pull down menu of it, and hide the section name, category title, author name, created date and time, and rest keep all other as global. Then save it by clicking save button on the right side.

Change "More about Joomla" to "Reserve Studies" by going to menu item and edit the more about Joomla by clicking it.

At first change its type to Article Layout, give its alias name and display it in main menu. Put it on the top in the parent item. And publish it by marking yes in the radio button. Give the access level to public. And in parameters (basic) select an article “Reserve Studies”. Make changes in the parameters (component).Click no in the ‘show title’ pull down menu, ‘show’ intro text. ‘Hide’ the section name, category title, and created date and time. Then click save button.

Its window is:


Unpublish the item ‘what’s New in 1.5’ under the More about Joomla. Then the FrontPage of the site looks likes the following:

By clicking Reserve Studies, it opens a new page describing the article.

VII. Resources menu contains various fields like Joomla Home, Forums, Documentation, Community, magazine. The need here is of only GIS Home, so all other fields must be removed from here.

Go to resources in the main menu, Click Joomla Home and edit this window. Write”GIS Home” instead of Joomla home in title. Give its alias, then write url of GIS home in the link field. Put it on to the top in Parent Item field and publish it. Mark its order as 1st and give access level as public. Then save it. Its window is shown below:


After saving it frontpage will look like this:

Unpublish all other fields in the resource menu except OSM Home and Administrator field by selecting the particular field and then click unpublish button on top right of the window. This will unpublish your fields from the front page under the resource menu. This is shown in the window below:


Frontpage will look like this:

And by clicking GIS Home in the resources menu, the home page of GIS Engg site gets open.


This is the way of working on Joomla when you have to change the basic menu to your particular fields.